The “My Numbers” section lets you set the parameters for incoming calls and their display on the workstation.
To access this section, click on the PBX icon, then on “My numbers”.
Setting up numbers
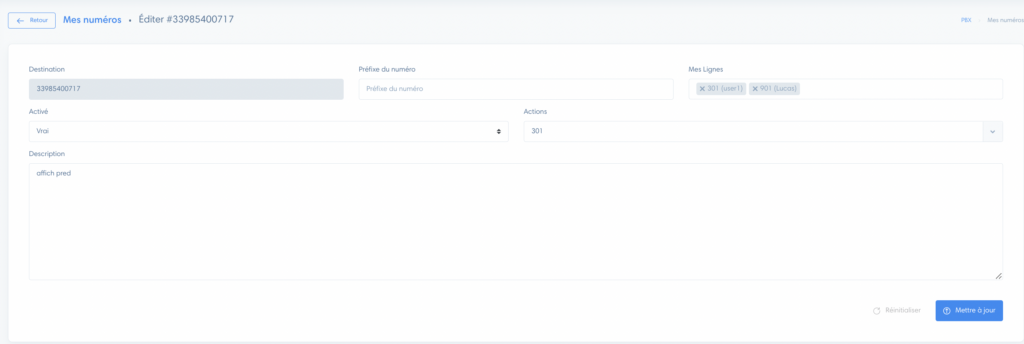
Once in the “My numbers” section, click on the pencil icon to change the settings of a number.

This takes you to the number parameters, where you can define the following fields:

- Destination : the number
- Number prefix: allows you to name the number. This is useful for finding out which number has called you, when several numbers are configured on the same extension.
- My lines: extensions that can use this number
- Enabled: enables or disables the number
- Actions : this is the action that will be triggered when there is an incoming call. For example, you can redirect the call to an extension, an interactive voice server, a call group or voicemail.
- Description: add descriptive text if necessary
Setting up the display on the workstation
Access number and sales pitch configurations
Click on “Configure number and sales pitch”.
This section lets you customize the workstation display.

Configuring the sales pitch
Here you configure a sales pitch that will be available from the workstation for incoming calls. Here’s how to configure it:
(1) Title: add the title of the sales pitch. This will be displayed above the sales pitch on the workstation.
(2) Sales pitch: write your sales pitch

Note
You can write your sales pitch in HTML.
Choose a default module
By clicking on “Module”, you can choose which module the prospect will be registered to when they call this number.

Configure fields
In this section, you choose which fields will be displayed on the workstation.
To add a field, click on it and move it to the right-hand column, using the arrows.
To remove a field, click on it and move it to the left-hand column.
Note
You can only add and remove fields you have created: default fields cannot be modified.
Automatic registration in the module
Check “Auto save in module” to have all incoming calls to this number automatically saved in CRM.


