
You have a file or files of prospects or potential customer data, and you want to contact them in less time to identify the “right prospects” or qualified leads.
You also use a CRM to keep track of your prospects and customers, so you can move them along a conversion tunnel.
With Kavkom Call Predictive, you can import these files, and when you contact a “good lead” or “qualified lead”, you cansend this lead and all its information into your CRM. Once in your CRM, you can submit it to all your marketing channels, workflows and so on.
Follow this guide to set up this feature.
1. CRM information
Contact your CRM publisher or development team for instructions on how to publish information via a URL, also known as Web Get. They’ll send you a URL tailored to your business and the data fields you can use.
Example: https: //yourcompany.leadtrac.ws/WebPost/import.aspx/? FIELDS: Last name, First name, Phone number, Address, Postal code, City, State.
2. Prepare your predictive campaign
Customize the corresponding data fields for the data you wish to publish in your CRM and qualifications. Create a campaign and import your prospect file(s).
3. Create URL
Create your personalized URL by taking the publication URL provided to you by your CRM publisher or developer.
https://www.leadmailbox.com/post.aspx?account=accountID&source=sourceexemple&
Note: URLs may sometimes stop at “?”, but other times they may contain variables to validate the source, such as “source=exampledesource&”.
Map Dialer Kavkom fields to your CRM fields. The Dialer Kavkom fields will be surrounded by #{ } which correspond to variables, so that the information in these fields is transmitted for each prospect, rather than the field names.
The URL you create should look like the example below.
https://www.leadmailbox.com/post.aspx?account=xxxx&source=HH&Phone=#{Phone}&FirstName=#{FirstName}&LastName=#{LastName}&Prop_Street=#{ Address}&Prop_City=#{Ville}&Prop_State=#{State}&Prop_Zip=#{Zip}&Email=#{Email}&CelPhone=#{CelPhone}
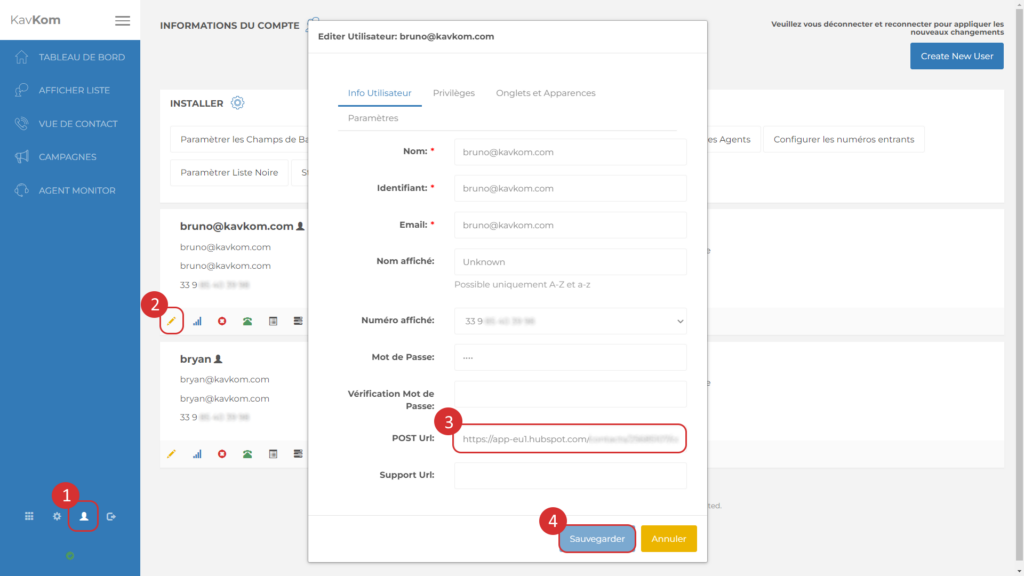
4. Enter the URL for each user
Go to the Admin menu (1) and click on Modify properties (2) for the user(s) for whom you wish to activate this feature. Then enter the URL in the “Post URL” input field (3) and click on “Save” (4).
Use the Post URL feature
Now, when you get a qualified or good lead, you can click on the “Post URL” icon in the “Contact View” to send the information to your CRM. (see“Contact View” article)
