
The “Contact View” is the space used by production users.
Note :
This is a view when all privileges are enabled, customizable for each user in the administrator settings. For more details, see the“User settings” article.
The “Contact View” consists of 6 sections:
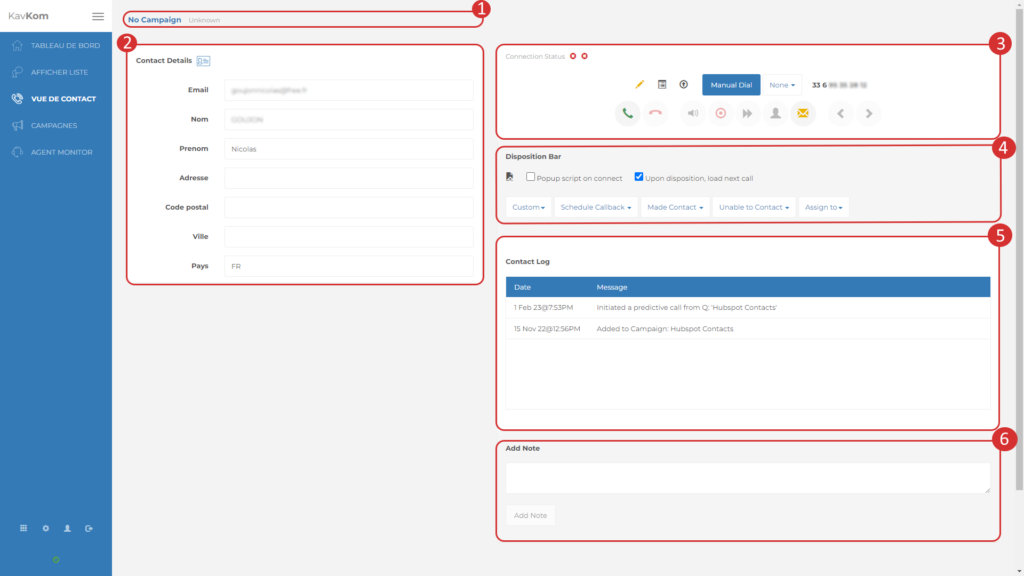
Status
The status bar shows :
- The name of the campaign to which the user is connected
- If the call is incoming, displaying “Inbound Call”.
- Connection status:
a. Waiting – Waiting for a contact
b. Talking – Connected with a contact
c. Idle – Waiting for qualification
d. Disconnected – Disconnected from the campaign - Dialing numbers.
Contact information
The contact information recorded when the file was imported is automatically displayed when the contact is connected to the user. The user can also modify and add information.
To set up data fields, see the article“Setting up data fields“.
Call keypad
The call keypad groups together actions related to communications.

- Connection status:
– Connected to campaign
– Connected to contact
– Disconnected
 - Edit contact number
- List of agent’s recent calls
- Post to URL (to send contact information to a third-party platform, see the article“Send qualified leads to your CRM“)
- Manual call
- Change call or campaign mode
- Telephone number of connected contact
- Connect to the campaign
- Disconnecting from the countryside
- Start playback of a recording (for more details, see“Playing sound during a call“)
- Activate / deactivate call recording
- Transfer call (for details, see“Hot call transfer“)
- Make a three-way call or an accompanied transfer
- Send an e-mail (for more details, see the“Sending e-mails” article)
- Contact previous / next
Call predictive actions
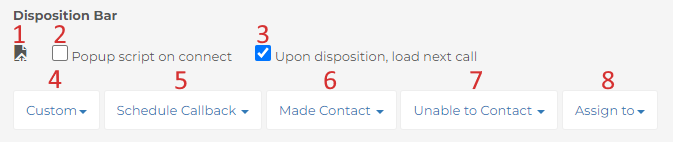
- Display a script (for more details, see the“Call script” article)
- Enable / disable automatic script display when connecting to a contact
- Enable / disable automatic contact switching after qualification
- Customized qualifications (to set up qualifications, go to“Setting up qualifications“)
- Set a reminder (for more details, see“Setting a reminder“)
- Default qualifications for connected contacts
- Default qualifications for unconnected contacts
- Assign the contact to another user to put the contact in their list.
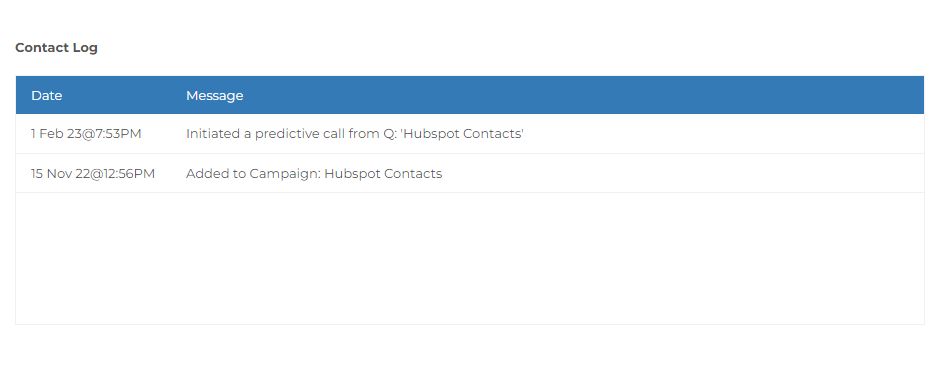
Contact history
The contact “History” section contains all the history concerning the prospect since its import. This information is also visible in export files.
Add note
Users can add notes manually by typing in the input field and clicking on “Add note”.

